Overview:
In this tutorial, we will see how to customize the existing standard Oracle report to get a delimited output file instead of the regular layout. Most business users prefer delimited report output as it can easily be imported into Excel where they can manipulate and perform calculations on the data easily.
Report Builder is the tool used to develop/customize Oracle reports. Before getting into the details, I would like to give an overview about Report Builder.
Main Components of a Report Builder:
Below is the snapshot of the Object navigator when you open a report in Report Builder. Some important components are Data Model, Layout Model, Parameter form, Triggers. Let’s discuss about each one of them in detail.

-
Data Model:
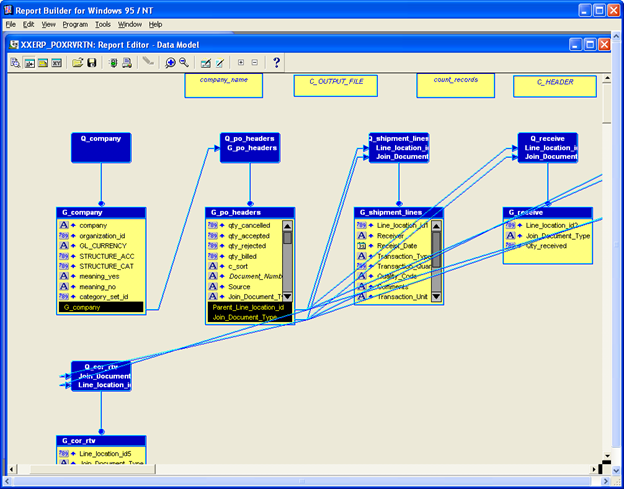
The Data Model is a work area in which you define what data to retrieve when the report is submitted. You create and define queries, groups, columns, parameters, and links which are called data model objects to determine what data needs to be extracted from the database as part of a report.
Tool Palette in Data Model view:

| # | Object | Object Name | Description |
| 1 |  |
Select | To Select objects for an operation |
| 2 |  |
Magnify | To Magnify an area |
| 3 |  |
SQL Query | To create a new query in the data Model |
| 4 |  |
RefCursor Query | To Create a new Ref Cursor query |
| 5 |  |
Summary Column | To create a summary column. A summary column performs a computation like sum, average, count, minimum, maximum, % total on another column’s data. |
| 6 |  |
Formula Column | To create a Formula column. A formula column performs a user-defined computation on another column’s data |
| 7 |  |
Cross Product | To create a Cross Product group |
| 8 |  |
Data Link | To create relationship between two queries in the data model |
| 9 |  |
Placeholder Column | To Create a Placeholder column. A placeholder is a column for which you set the datatype and value in PL/SQL that you define. You can set the value of a placeholder column in the following places:
— Before Report Trigger, if the placeholder is a report-level column — report-level formula column, if the placeholder is a report-level column –a formula in the placeholder’s group or a group below it (the value is set once for each record of the group) |
-
Layout Model:
Layout Model is a work area in which you can define the format (using objects like frames, repeating frames, fields, boilerplate, anchors, and Graphics objects) of your report output. When you run a report, Report Builder uses the Layout Model as a default template for the report output.
Layout Tool Palette:

| # | Object | Object Name | Description |
| 1 |  |
Select Tool | To select one or more objects |
| 2 |  |
Frame Select | To select frame or repeating frame and all the objects within them. |
| 3 |  |
Rotate | To rotate Objects |
| 4 |  |
Reshape | To change the shape of the objects |
| 5 |  |
Magnify | To magnify the area |
| 6 |  |
Line | To draw a line |
| 7 |  |
Rectangle | To draw a rectangular object |
| 8 |  |
Rounded Rectangle | To draw a rounded rectangular object |
| 9 |  |
Ellipse | To draw a elliptic object |
| 10 |  |
Arc | To draw arc |
| 11 |  |
Polyline | To create a Polyline object |
| 12 |  |
Polygon | To draw a polygon object |
| 13 |  |
Text | To create a Text object |
| 14 |  |
Freehand | To create a free form obk=ject |
| 15 |  |
Frame | To create a frame. Frames are used to surround other objects and protect them from being overwritten or pushed by other objects |
| 16 |  |
Repeating Frame | To create a repeating frame. Repeating frames surround all of the fields that are created for a group’s columns meaning each repeating frame must be associated with a group created in the Data model. The repeating frame prints (is fired) once for each record of the group. |
| 17 |  |
Link file | To create an object that is read in from file |
| 18 |  |
Field | To create a field |
| 19 |  |
Chart | To create a Chart |
| 20 |  |
Button | To create a button |
| 21 |  |
Anchor | To create an anchor between two objects. Since the size of some layout objects may change when the report runs, you need anchors to define where you want objects to appear relative to one another. |
| 22 |  |
OLE2 | To create OLE2 object |
- Parameter Form:
Parameter Form enables you to define the parameters for your report.
Tool Palette:

-
Report Triggers:
Report triggers execute PL/SQL functions at specific times during the execution and formatting of your report. Report Builder has five global report triggers:
-
After Parameter Form trigger:
This trigger fires after the Parameter form is displayed.
-
After Report trigger:
This trigger fires after the report output is displayed. You can use this trigger to delete any temporary values or tables created during the process.
-
Before Parameter Form trigger:
This trigger fires before the Parameter form is displayed.
-
Before Report trigger:
This trigger fires before the reports is executed but after queries are parsed and data is fetched.
-
Between Pages trigger:
This fires before each page of the report is formatted, except the very first page. This can be used to display page totals etc.
-
Report Customization steps:
When you have to customize a standard report, it is always advisable not to make changes to the standard report itself, instead rename it to another report and make the changes to it.
Steps:
- Download the original rdf from the file system.
- Open it in Report builder.
- Save it with a different name that meets the client’s naming conventions.
- Make the necessary changes to it.
- Save and compile the report.
- Move it to the custom top/reports/US
- Register it as a concurrent program in Oracle Applications under custom application.
Steps to change the report output to a Pipe delimited output:
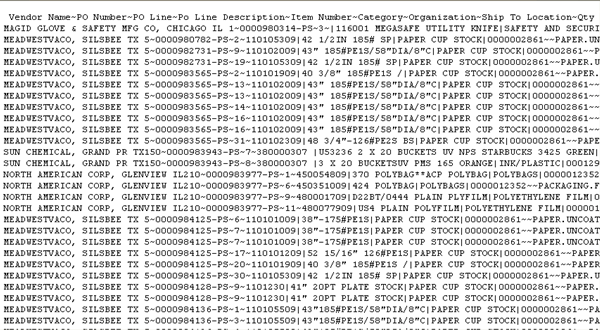
The requirement here is to customize the standard “Receipt Adjustment report” to get a delimited output file instead of the regular layout. The output file should have header information like shown below on the top of the output page followed by the receipt adjustment data whose fields are separated by ‘~’.
Vendor Name~PO Number~PO Line~Po Line Description~Item Number~Category~Organization~Ship To Location~Qty Ordered~Net Qty Received~Qty Billed~Qty Accepted~Qty Rejected~Qty Cancelled~Received Qty Corrected~Net Qty RTV~Qty RTV Corrected~Receipt Num~Transaction Date~Transaction Type~Parent Transaction~Transaction amount~Unit
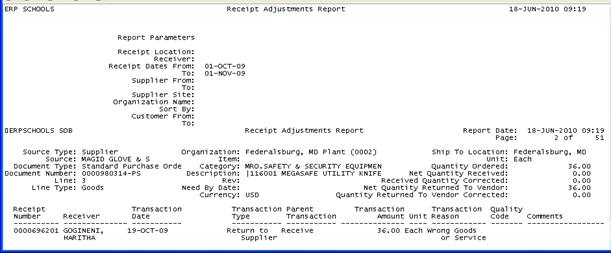
Regular Layout generated by the standard report:
We need Pipe delimited Output file like the below:
To achieve this:
-
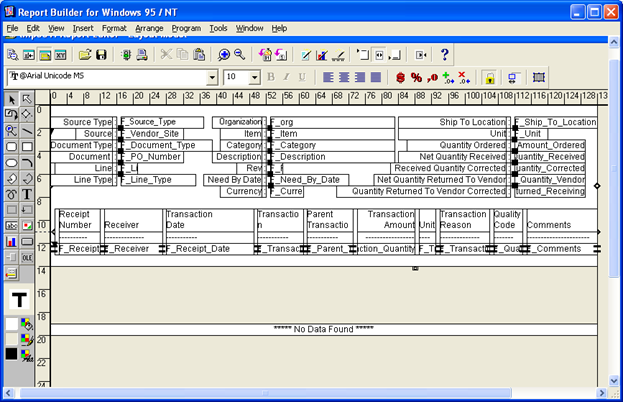
We have to get rid of the current layout and create a new layout with 2 objects:
Frame to print the header information.
Repeating Frame to print the data.
- We need to create a Formula column in the Data model that will get the concurrent program’s output filename. We will use this file to write our pipe delimited report output to.
Steps:
- Download the original report POXRVRTN.rdf
- Open the report in the Report Builder. File>Open
-
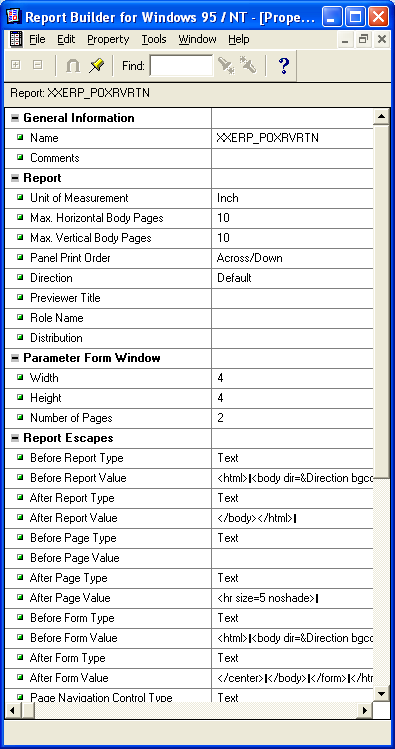
Rename it according Custom naming conventions followed by the client. Here we will rename it to XXERP_POXRVRTN
Tools> Property Palette
Give the name as: XXERP_POXRVRTN
- To Create a Formula column to derive the output file name:
- Double click on the Data model in the Object Navigator.
- Click
 in the tool palette
 - Click and drag a rectangle.
-
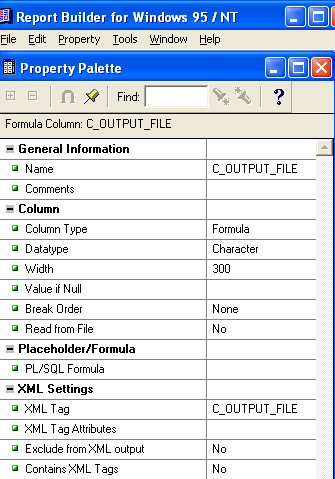
Double-click the formula column created in the data model to open up its property palette where you can set its properties.
Name: Give the name as C_OUTPUT_FILE
Data Type: Choose Character
Width: 300
PL/SQL Formula: Insert the below code which gets the Concurrent program’s output filename from the database.
function C_OUTPUT_FILEFormula return Char is
v_filename fnd_concurrent_requests.outfile_name%type;
begin
SELECT outfile_name
INTO v_filename
FROM fnd_concurrent_requests
WHERE request_id = :P_CONC_REQUEST_ID;
RETURN(v_filename);
exception
when others then
RETURN(null);
end;


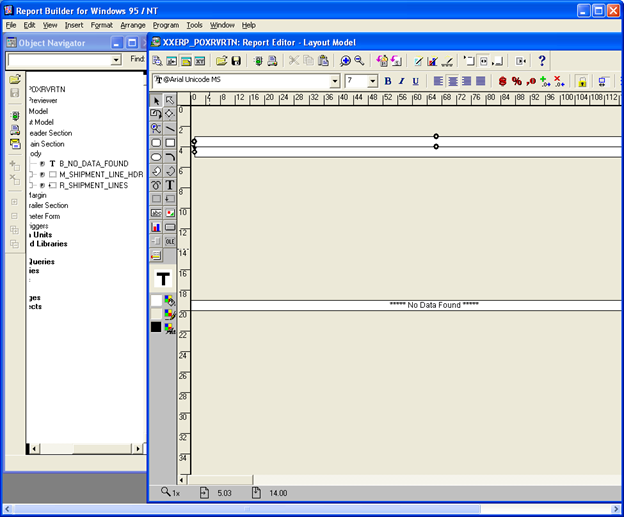
- Double click on the Layout model in the Object Navigator.
- Remove all the objects placed in the layout model except “No Data Found” Object.
-
Place a Frame and a repeating frame one below the other as shown below.
-
To place a frame in the Layout:
Click
 in the tool palette.
Click and drag a rectangle.
Double-click the frame object in the layout to open up its property palette where you can set its properties.
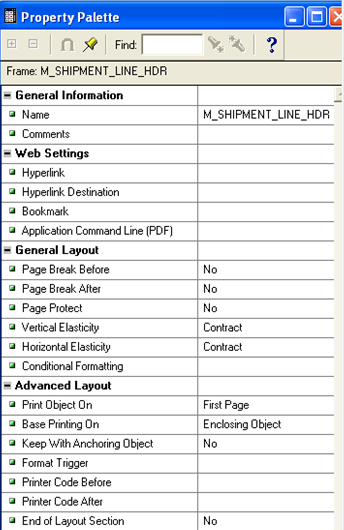
Some important properties are discussed here.
- Name: Rename it to whatever you want.
-
Vertical and Horizontal Elasticity: For frames and repeating frames, elasticity defines whether the size of the frame or repeating frame should vary with the objects inside of it.
Possible Values that you can enter are Contract, Expand, Fixed, and Variable.
- Contract means the vertical (for vertical elasticity) or horizontal (for horizontal elasticity) size of the object decreases, if the formatted objects or data within it are short (for vertical elasticity) or less wide (for horizontal elasticity) enough, but it cannot increase to a height (for vertical elasticity) or width (for horizontal elasticity) greater than that shown in the Report Editor.
- Expand Means the vertical (for vertical elasticity) or horizontal (for horizontal elasticity) size of the object increases, if the formatted objects or data within it are tall or more wide enough, but it cannot decrease to a height or width less than that shown in the Report Editor.
- Fixed Means the height or width of the object is the same on each logical page, regardless of the size of the objects or data within it. Truncation of data may occur.
-
Variable Means the object may expand or contract vertically to accommodate the objects or data within it (with no extra space), which means the height or width shown in the Report Editor has no effect on the object’s height or width at runtime.
-
To place a repeating frame in the Layout:
Click
 in the tool palette.
Click and drag a rectangle.
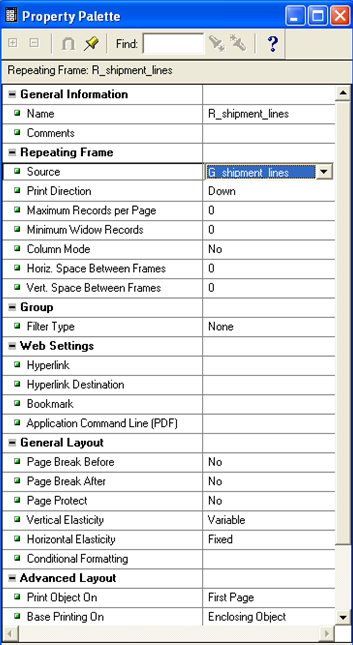
Double Click on Repeating Frame to open up the property palette and rename it. Every repeating frame must be associated with a group defined in the Data model.
Here give the Source as “G_shipment_lines”.
Set the Vertical and horizontal elasticity to the required.
-
To print a pipe delimited text in the output file, we will use a format trigger on the frame and repeating frame.
A format trigger is a PL/SQL function executed before an object is formatted. This function must return a Boolean value (TRUE or FALSE). Depending on whether the function returns TRUE or FALSE, the current instance of the object is included or excluded from the report output. Format trigger can be used to highlight a value, for suppressing values and labels.
In the property palette of the Frame, under Advanced Layout section:


Double Click on the Format Trigger. This opens up a SQL Editor, where you can place the below code to print the header information to the output file.
function M_SHIPMENT_LINE_HDRFormatTrigg return boolean is
–Variable declaration
cmd_line VARCHAR2(3000);
v_file_name text_io.file_type;
begin
–Setting cmd_line variable to the header info
cmd_line := ‘Vendor Name’||’~’||’PO Number’||’~’||’PO Line’||’~’||’Po Line Description’||’~’||’Item Number’||’~’||’Category’||’~’||’Organization’||’~’||’Ship To Location’||’~’||’Qty Ordered’||’~’||’Net Qty Received’||’~’||’Qty Billed’||’~’||’Qty Accepted’||’~’||’Qty Rejected’||’~’||’Qty Cancelled’||’~’||’Received Qty Corrected’||’~’||’Net Qty RTV’||’~’||’Qty RTV Corrected’||’~’||’Receipt Num’||’~’||’Transaction Date’||’~’||’Transaction Type’||’~’||’Parent Transaction’||’~’||’Transaction amount’||’~’||’Unit’;
–Opening the concurrent request’s output file to write the data into it
–Always prefix “:” with the field,when you refer to a field in the data model like
:C_OUTPUT_FILE
v_file_name := TEXT_IO.FOPEN(:C_OUTPUT_FILE, ‘A’);
IF TEXT_IO.IS_OPEN(v_file_name) THEN
TEXT_IO.PUT_LINE(v_file_name, cmd_line);
END IF;
TEXT_IO.FCLOSE(v_file_name);
–If the return value is true then only this object will be included in the report output
return (TRUE);
end;
Similarly include the below code in the format trigger of the repeating frame to write the receipt records into the output file.
function R_shipment_linesFormatTrigger return boolean is
cmd_line VARCHAR2(2000);
v_file_name text_io.file_type;
begin
cmd_line := :Source||’~’||:Document_Number||’~’||:Line||’~’||:Description||’~’||:C_FLEX_ITEM_DISP||’~’||:C_FLEX_CAT_DISP||’~’||:Organization_name||’~’||:Ship_To_Location||’~’ ||:Quantity_Ordered||’~’||:C_qty_net_rcvd||’~’||:qty_billed||’~’||:qty_accepted||’~’||:qty_rejected||’~’||:qty_cancelled||’~’||:C_qty_corrected||’~’||:C_qty_rtv_and_corrected||’~’||:C_qty_corrected_rtv||’~’||:Receipt_Number||’~’||:Receipt_Date||’~’||:Transaction_Type||’~’ ||:Parent_Transaction_Type||’~’||:Transaction_Quantity||’~’||:Transaction_Unit;
v_file_name := TEXT_IO.FOPEN(:C_OUTPUT_FILE, ‘A’);
IF TEXT_IO.IS_OPEN(v_file_name) THEN
TEXT_IO.PUT_LINE(v_file_name, cmd_line);
END IF;
TEXT_IO.FCLOSE(v_file_name);
return (TRUE);
end;
- Now that the changes are done, save the report.
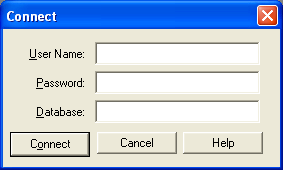
- Connect to the database by navigating to File > Connect
-
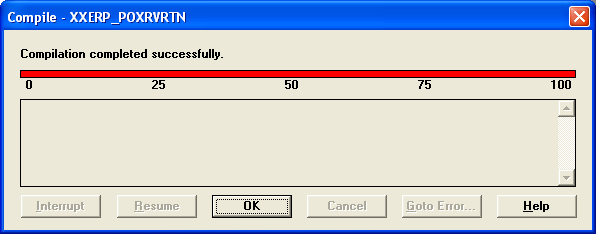
Then compile the report by navigating to Program> Compile> All.
Errors will be listed if there are any. Correct them and recompile. If there are no errors and the compilation was successful, you will get the below message. Click OK and save again.
- Now move the report to the Custom top/Reports/US
- Register it as a concurrent program in Oracle Applications and assign it to the desired responsibilities. Please refer to Concurrent Program registration article for registration details.