Using Oracle iExpenses, employees can enter and submit expense reports. There is a Workflow process that is initiated behind when an expense report is submitted which automatically routes expense reports for approval. Oracle Internet Expenses integrates with Oracle Payables to provide quick processing of expense reports for payment.
This article includes these topics:
- Process Overview
- Approval Hierarchy
- Administrative features in iExpense
-
Workflow Notifications — Error Handling
Process Overview:
The employees would be issued Corporate credit cards which could be used for organization’s business expenses. The bank would send in all the credit card transaction files on a daily basis or the agreed time interval. These credit card transactions have to be loaded into AP_CREDIT_CARD_TRXNS_ALL table using credit card transaction loader programs. After loading credit card transactions data into the AP_CREDIT_CARD_TRXNS_ALL table, the Credit Card Transactions Validation program should be run to validate the loaded data. Once validated, employees can enter these credit card transactions on expense reports to get re-imbursement from the company.
Once the employee vouchers the expenses through iExpense responsibility or Expense report screen in Account Payables responsibility and submits it, the workflow with the internal name APEXP is initiated which would validate the data entered, determine the Approver, sends notifications to the approver. The Approver has to then Approve or Reject the notification accordingly. Once the workflow activities are complete, use the concurrent program Expense Report Import to create Payables invoices from expense reports you enter in Payables or Oracle Internet Expenses. You can then use Payables to validate and pay these invoices and create accounting entries for them.
Approval Hierarchy in iExpense:
If the profile option “AME: Installed” is set to Yes, then the routing rules for approvals setup in Oracle Approvals Management are used, If set to No then the Employee/Supervisor Approval Process is used.
Employee/Supervisor Approval Process:
In the Employee/Supervisor Approval Process, the supervisor of the Expense report’s owner would become the APPROVER. Every Employee should be assigned a Supervisor within Human Resources Responsibility- (New Hire: Assignments).An employee must be set up as a supplier prior to entering the expense report.
Managers can approve an expense report only if the total amount of the expense report does not exceed their signing limit. The Manager (Spending) Approval Process in the Expense Reporting workflow uses the signing limits you define(Navigation: Account Payables responsibility – Employees> Signing Limits )to determine which manager has authority to approve expense reports. If the amount on the expense report exceeds the signing limit of the approver, the expense report is automatically forwarded to the manager of the approver. This goes up the management hierarchy until an Approver is found who could approve the Expense report.
This process does not look at the purchasing Approval Hierarchy.
Administrative features in iExpense:
- Delegating the authorization to enter the expenses on one’s behalf:
You can authorize an employee to enter expense reports for another employee. An employee who is assigned the responsibility to enter expense reports for another employee is an authorized delegate
There are 2 ways this could be done:
-
Go to System Administrator>Security> Users
Query for the User’s record. Under Securing Attributes tab, add the below details:
Attribute: ICX_HR_PERSON_ID
Application: Self-Service Web Applications
Value: Employee Id or the Person_id to whom the access to enter the expense reports has to be given.

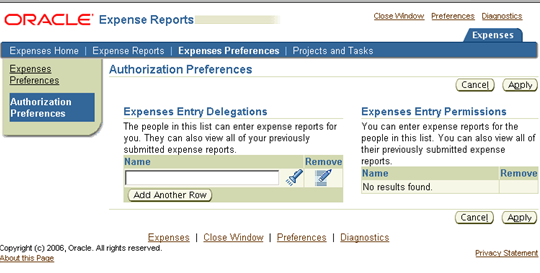
- Go to the iExpense responsibility > Expense Preferences >Authorization Preferences
Under Expenses Entry Delegations, click on the Add another row and enter the name
to whom the access to enter the expense reports on your behalf has to be given.
- Re-direct or Auto respond to the notifications:
If the approver is on leave, the notification could be delegated or forwarded to the desired approver using Create Vacation Rule.
Steps to create Vacation rule:
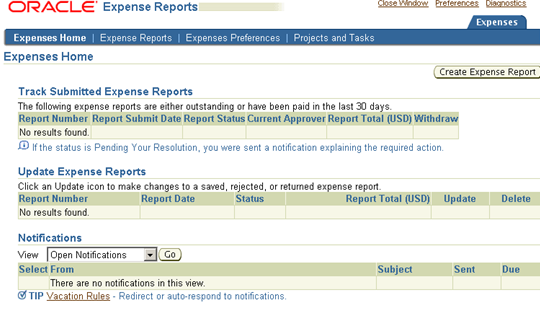
1. iExpense Responsibility> Expenses Home
2. Select the “Vacation Rule” link
3. Select the “Create New Rule” link
4. For Item Type select “Expenses” for all Notifications or select the desired Notification Type from List of Values
5. Select the “Next” link to proceed to the next setup page for the rule
6. Enter both a a valid Start and End Date for the new rule
7. Ensure the “Reassign” radio button is selected
8. Keep “All Employees and Users” in the menu box
9. Select the “Delegate” radio button – Assign/Reassign action is prohibited for Purchasing Notifications
10. Select the Flashlight icon next to the blank menu box for selecting a user
11. A new sub-screen should pop-up to perform the user search
12. For “Search By” select “Username” – (DO NOT search by Name)
13. Perform the needed wildcard (%) search at the top of the page to locate the desired username
14. Click the radio button next to the desired name of the user to have the notifications sent to
15. Press the “Select” button followed by the “Apply” button
16. Continue on with the saving of the Vacation Rule for latter use
-
Assigning the Card to another person to voucher the expenses on someone’s behalf
This could be done if a person has to access the outstanding credit card charges of another person to voucher them (temporarily). The disadvantage with this would be, the charges will be vouchered under the assignee’s name and would go to the assignee’s manager for Approval.
Workflow Notifications Error Handling:
In this section we will mainly focus on the notifications that are sent to the APPROVER for the approval as it is very important to see that such notifications reach the APPROVER on time so that there is no delay in the processing of the expense report to avoid late fee enforced by the Credit Card company. These notifications will have the message_name as ‘OIE_REQ_EXPENSE_REPORT_APPRVL’ in wf_notifications table. The mail status of the notification can be SENT, CANCELED, MAIL, UNAVAIL, ERROR, NULL. Let us see in detail about these and the actions required to get the notification to SENT status..
The below is the script to check the notification status:
select wn.notification_id,
aerh.invoice_num,
TO_CHAR(wn.begin_date,'DD-MON-YYYY hh:mi:ss') begin_date,
wn.to_user,
wn.from_user,
wr2.display_name preparer,
wr3.display_name reported_for,
wn.status,
wn.mail_status mail_status,
aerh.expense_status_code ,
WR.email_address ,
aerh.total,
aerh.report_submitted_date ,
aerh.description,
from wf_notifications wn,
wf_item_activity_statuses was,
wf_items wi,
ap_expense_report_headers_all aerh,
WF_ROLES WR,
wf_roles wr2,
fnd_user fu,
wf_roles wr3
where 1=1
and wn.notification_id = was.notification_id
and was.item_type = wi.item_type
and was.item_key = wi.item_key
and wn.status IN ( 'OPEN', 'CANCELED')
and wn.message_name = 'OIE_REQ_EXPENSE_REPORT_APPRVL'
and aerh.invoice_num = wi.user_key
and aerh.expense_status_code IN ( 'PENDMGR', 'RESOLUTN' )
and WN.recipient_role= WR.name (+)
and wi.owner_role = wr2.name
and aerh.employee_id = fu.employee_id
and fu.user_name = wr3.name (+)
;
SENT: The notification has been successfully sent to the APPROVER.
CANCELED: The system is setup to send the notifications n times (n can be set in the workflow attributes) with a timeout after 5 days. If the Approver does not approve or reject within the time frame, the workflow will cancel the notification automatically and then the notification will end up in the status CANCELED.
Action: In such cases, RETRY would not work instead ask the preparer to withdraw and re-submit the expense report.
MAIL: If the notification is not SENT to the approver, the status would be MAIL.
Action: Ask the DBA to bounce the workflow. This would solve the problem most times. But if it doesn’t i.e if the status is still MAIL, then RETRY the activity ‘Request Approval from APPROVER’ using the Workflow Administrator responsibility (demo below). If yet not sent, check the Attributes like Approver’s email etc.
BLANK: Sometimes the value of the status would be NULL.
Action: Sometimes even if the status is BLANK, the notification is sent to the approver. First check with the Approver to see if the notification is sent. If not sent, RETRY the activity.
UNAVAIL: This would happen usually when there is problem with the Approver’s preferences or Email address.
Action: Check the notification preference of the Approver using the below:
SELECT WFU.NAME, WFU.display_name,WFU.notification_preference, email_address ,wfu.status
FROM WF_USERS WFU
WHERE WFU.name in (‘NAME’) (NAME would be the user_name in FND_USER table)
The notification_preference can be set to one of the below
MAILTEXT
QUERY
DISABLED
MAILHTM2
MAILHTML
MAILATTH
Make sure that it is set to MAILHTML
Also check if the email address returned in the above query is a valid one and matches with the one in HR Employee record (hr_employee table), fnd_user table and the outlook email address.
Also check if the status is ACTIVE in the above query, if the APPROVER is an existing employee and his FND_USER account is ACTIVE.
FAILED:
Action RETRY would solve this case.
ERROR:
Action: Check the ERROR and act accordingly. Some sample Errors:
–Failed Activity AP Validate Expense Report
Activity Type Function
Error Name -20001
Error Message ORA-20001: APP-SQLAP-10000: ORA-00984: column not allowed here occurred in AddDistributionLine with parameters (&PARAMETERS) while performing the following operation: parse cursor
Error Stack AP_WEB_EXPENSE_WF.APValidateExpenseReport(APEXP, 142459, 0, Call DoAPValidationORA-00984: column not allowed here occurred in AddDistributionLine with parameters (&PARAMETERS) while performing the following operation: parse cursor) Wf_Engine_Util.Function_Call(AP_WEB_EXPENSE_WF.APVALIDATEEXPENSEREPORT, APEXP, 142459, 175587, RUN)
Check if the code combinations are all passed in correct and if it exists. There is something wrong in the data which results in this error. If the expense report errors out in this Stage i.e it has not passed the validation, Status in expense report header would not be WEBEXPENSE and hence cannot see this in AP.
–. No Approver/Performer ERROR:
Check to see if there is any supervisor assigned in HR
Check to see if Supervisor exists in USERS list and in HR.
If everything is fine, In the status monitor, query for the Item key
Click on Active History
Check Request approval from APPROVER, hit Update attributes.
Fill in the appropriate Manager Id (Employee ID), Manager name(WF_USER.NAME), Manager Display Name(WF_user.display_name), approver ID, approver name ,Approver display name and hit Apply.
Go back to Active history, Check Request approval from APPROVER, hit Rewind.
–DISCARD folder error:
Failed Activity Request Approval from APPROVER
Activity Type Notice
Error Name WFRSPPR_BOUNCE
Error Message 2405: Notification ‘1251131’ has bounced. Check mailer log and discard folder. STATUS=ERROR ROLE=ABHI
Ask the DBA to resend the notification from Workflow mailer. This is due to Mail Format or OUTLOOK version issues.
–Environment context Error:
Failed Activity Request Approval from APPROVER
Activity Type Notice
Error Name WF_ERROR
Error Message [WF_ERROR] ERROR_MESSAGE=3835: Error ‘-20001 – ORA-20001: Oracle error -20001: ORA-20001: APP-FND-02500: Error occurred during product initialization for MO when executing ‘begin MO_GLOBAL.INIT; end;’. SQLCODE = -20001 SQLERROR = ORA-20001: APP-FND-02902: Multi-Org profile option is required. Please set either MO: Security Profile or MO: Operating Unit profile option. has been detected in FND_GLOBAL.INITIALIZE.’ encountered during execution of Generate function ‘WF_XML.Generate’ for event ‘oracle.apps.wf.notification.send’. ERROR_STACK= Wf_Engine_Util.Function_Call(AP_WEB_EXPENSE_WF.CALLBACKFUNCTION, APEXP, 144392, SET_CTX) Wf_Engine_Util.Execute_Selector_Function(APEXP, 144392, SET_CTX) Wf_Engine_Util.Function_Call(AP_WEB_EXPENSE_WF.CALLBACKFUNCTION, APEXP, 144392, TEST_CTX) Wf_Engine_Util.Execute_Selector_Function(APEXP, 144392, TEST_CTX) Wf_Engine.CB(TESTCTX, APEXP:144392:175390, ::::) Wf_Engine.oldCB(TESTCTX, APEXP:144392:175390, ::::) WF_MAIL.SetContext(1252292) WF_XML.GenerateDoc(oracle.apps.wf.notification.send, 1252292) WF_XML.Generate(oracle.apps.wf.notification.send, 1252292) WF_XML.Generate(oracle.apps.wf.notification.send, 1252292) Wf_Event.setMessage(oracle.apps.wf.notification.send, 1252292, WF_XML.Generate) Wf_Event.dispatch_internal()
Error Stack
RETRY would resolve the problem.
If all the attempts were futile in sending the notification to the Approver, the last action to resolve would be to ask the approver to go to IExpense responsibility and approve manually.
RETRY Demo:
- Log into Workflow Admin responsibility
- Go to Administrator Workflow > Status Monitor
-
Key in the following values:
Type Internal Name: APEXP
User Key: Expense Report Number
- Click Go
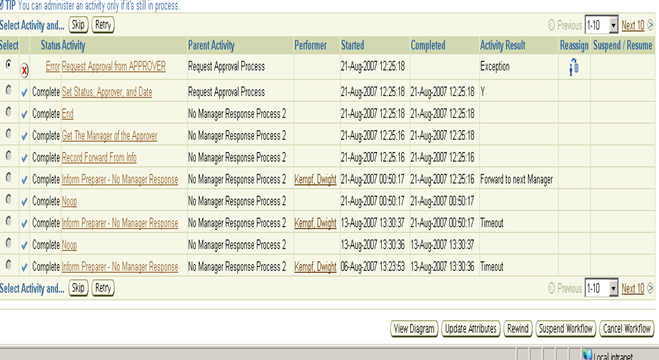
- Select the Radio button and click on Activity History.

- Select the Activity you want to RETRY say “Request Approval from APPROVER” and click on the Retry button on the top.
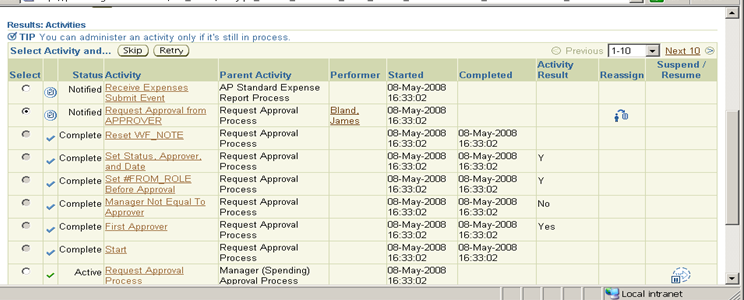
- Click on Submit button in the next screen.
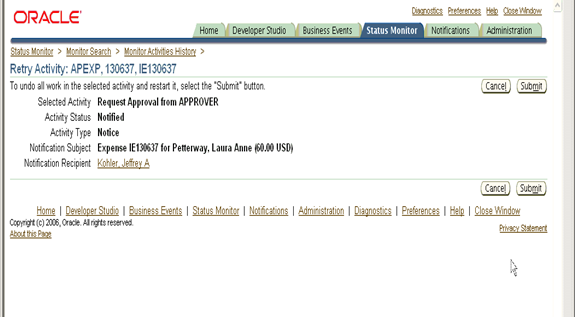
- Confirm the details in the next page by clicking the OK button.
REWIND Demo:
- Log into Workflow Admin responsibility
- Go to Administrator Workflow > Status Monitor
-
Key in the following values:
Type Internal Name: APEXP
User Key: Expense Report Number
- Click Go
- Select the Radio button and click on Activity History.
- Select the Activity which you want to REWIND for example say “Request Approval from APPROVER” and click on the Rewind button on the bottom.
- Choose the activity to which you want the workflow to return in the next screen and select the “Apply” button. This would REWIND the activity.
UPDATE ATTRIBUTES Demo:
In the “Activity History” screen, click on the “Update Attributes” Button at the bottom. This opens up a page with all the attributes where you could update the necessary and hit “Apply” button to save the changes.