SQL Validation used for profile options List of Values:
Before proceeding further, we recommend you to go through our article on Profile Option in Oracle Apps where we have covered how to create a profile option and assign a value (user enters free text as value) to it.
Many a times, you need to a List of Values (LOV) for the profile option so that while assigning a value, the user can choose a value from LOV instead of typing it.
This article focuses on how to create LOV based on some tables in the database for a profile option.
1.Navigate to Application Developer responsibility > Profile
2.Query the profile option that you have created earlier
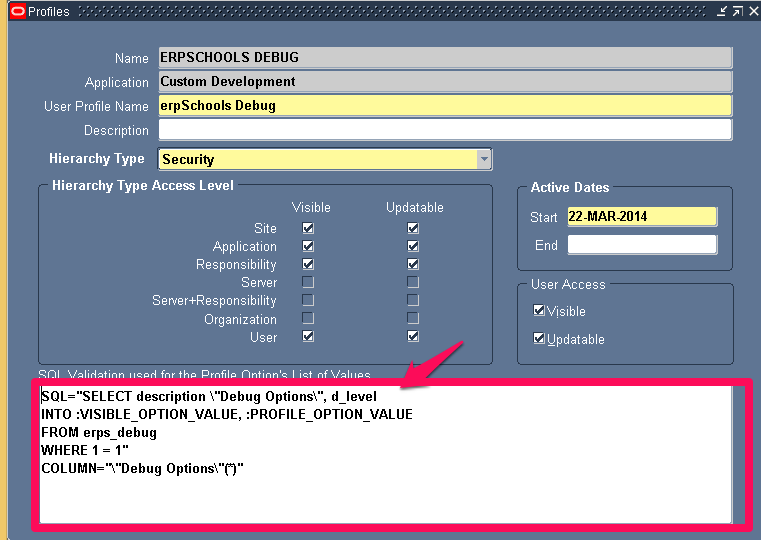
3.Enter the below in the SQL Validation field. Save the work.
SQL=”SELECT description “Debug Options”, d_level
INTO :VISIBLE_OPTION_VALUE, :PROFILE_OPTION_VALUE
FROM erps_debug
WHERE 1=1″
COLUMN=””debug options”(*)”
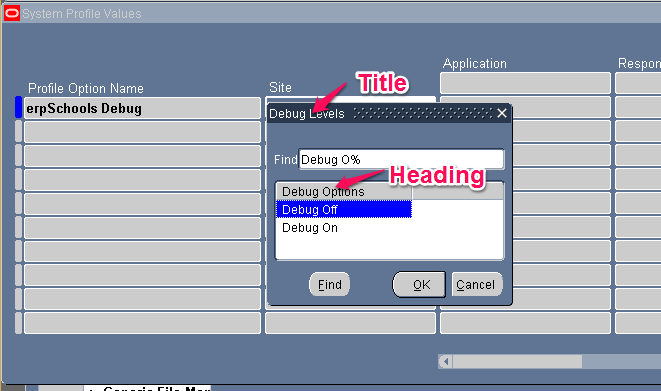
TITLE=”Debug Levels”
HEADING=””Debug Options”(*)”

4.There are certain rules and regulation on how to write the SQL query.
Syntax should be as below:
SQL=”SQL SELECT Statment”
COLUMN=”column1(length), column2(length),…”
[TITLE=”{title text|*application shortname:message name}”]
[HEADING=”{heading1(length), heading2(length),…
|*application shortname:message name|N}”]
a)SELECT Statement: This SQL statement differs from a normal SQL statement in some ways.
Example: SELECT column1 “PROFILE OPTION ID”, column2 “PROFILE OPTION VALUE”
INTO :VISIBLE_OPTION_VALUE, :PROFILE_OPTION_VALUE
FROM xyz
WHERE column1 = 10
You can use Group by and Having clause after WHERE clause depending on your requirement. You can also have aliases for your columns. Column aliases cannot be longer than 30 characters. If you want to include spaces in your column aliases, you must put a backslash and double quotes before and after the column alias
VISIBLE_OPTION_NAME: What column in the table that you want to display in LOV
PROFILE_OPTION_VALUE: What column/value you want to store in the database for this profile option
b)COLUMN: Lists the names of columns (or column aliases) you want to display in your LOV window, the order in which to display them, and their display widths. If you have more than one column in your COLUMN option, the LOV displays the columns in the order you specify in your COLUMN statement.
c)TITLE:Text you want to display centered and highlighted on the top line of your LOV window. The default is no title.
d)HEADING:Lets you specify a list of column headings and column widths, separated by spaces or commas. Column widths you specify in the HEADING =”…” parameter override columns widths you specify in the COLUMN=”…” parameter. You can specify a Message Dictionary token in your LOV definition by providing the application short name and the message name. Any heading starting with “*” is treated as a Message Dictionary name.
5.Having created the LOV for Profile option, lets go back to assign the value.
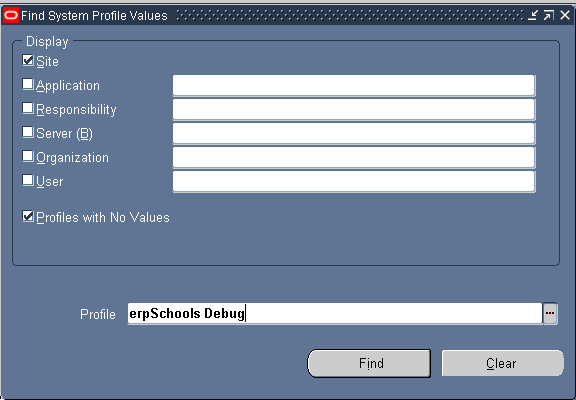
Navigation: System Administrator responsibility > Profiles > System
Query for the Profile Option name erpSchools Debug

Click on the … button and you will see a LOV popping up (that you have created just now).

Select one value and save.

6.Now let’s see what value is stored for this profile option in the database. Connect to the database as APPS and execute the below query
|
1 |
select fnd_profile.value(‘ERPSCHOOLS DEBUG’)Value from dual |

Even though we selected “Debug Off” as value, in the database we see a value 2 is assigned. That is because we have specified in our LOV query to store column d_level value through option :PROFILE_OPTION_VALUE.