Objectives:
- Forms Customization Overview
- Mandatory Form and Libraries
- Setting the Forms60_Path in Registry
- Develop the form using form builder tool
- Changes to be made in the Triggers and Program Units
- Transfering the fmb file from local system to Vision Instance
- Generating the fmx file on Vision Instance
- Registering the form in Oracle Apps
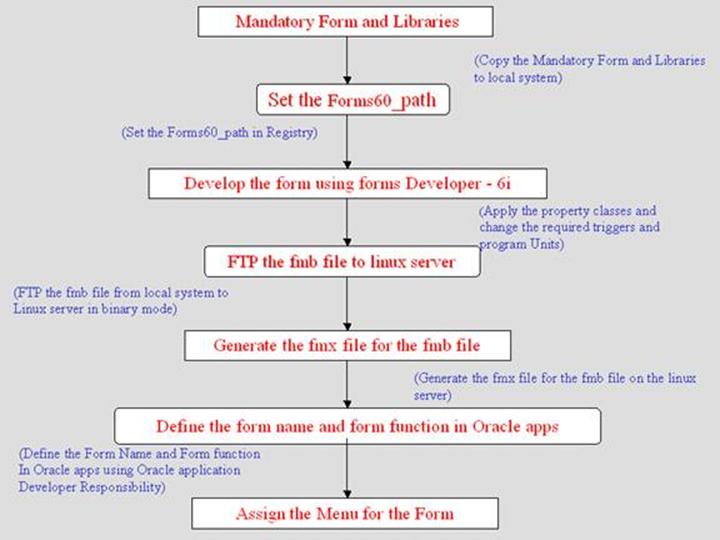
Forms Customization Overview
The following Diagram shows how the form customization is done at different levels:
Mandatory Form and Libraries
- In order to develop a form for Customization first we have to install the Oracle Forms Developer Version 6i on our local system.
- FTP the Mandatory form i.e., TEMPLATE.fmb and required Pll’s from Vision Instance to the local machine.
- The TEMPLATE.fmb file would be under the following path: /d01/oracle/visappl/au/11.5.0/forms/US/
- The PLL’s would be under the following path: /d01/oracle/visappl/au/11.5.0/resource/
- The PLL’s are:
APPCORE.pll
APPCORE2.pll
APPDAYPK.pll
APPFLDR.pll
CUSTOM.pll
FNDSQF.pll
FV.pll
GHR.pll
GLOBE.pll
GMS.pll
HRKPI.pll
IGILUTIL.pll
IGILUTIL2.pll
JA.pll
JE.pll
JL.pll
OPM.pll
PQH_GEN.pll
PSA.pll
PSAC.pll
PSB.pll
VERT.pll
VERT1.pll
VERT2.pll
VERT3.pll
VERT4.pll
VERT5.pl
Setting up Forms60_Path in Registry
- Copy all these PL/SQL libraries and the Template form in one folder.
- Now we have to set the form60 path in the registry. Go to Start > Run > Regedit > HKEY_LOCAL_MACHINE > Software > Oracle
- Here we can find the oracle homes. In these homes check for FORMS60_PATH.
- Append the path of your folder where all the libraries and the form is present, prefixed with a semicolon(;).
E.g.: Before Appending “C:formsTOOLSOPEN60PLSQLLIB”
After Appending “C:formsTOOLSOPEN60PLSQLLIB;c:formslibraries”
Develop the form using Form Builder Tool
a)Open the Forms Builder tool and click on the “Build a form based on a template” radio button
b)Choose the TEMPLATE.fmb form from your local working directory.
c)SAVE your new FORM as with a different filename. Also rename the module with the same name as the filename.
d)Create your blocks, items, triggers and relationships as per requirement.
e)Save your FORM frequently!!
Apply property classes to each item to ensure the same look and feel as the rest of Oracle Apps forms.
For each Module, Canvas, Window etc., apply the Property Classes that is most appropriate.
Item Type Property Class
Module MODULE
Canvas CANVAS
Window WINDOW
Data Block BLOCK
Row ID ROW_ID
Text Item TEXT_ITEM
Display Item DISPLAY_ITEM or EXT_ITEM_DISPLAY_ONLY
Creation Date CREATION_OR_LAST_UPDATE_DATE
Last Update Date CREATION_OR_LAST_UPDATE_DATE
To apply the property class, click on the small button (on the right) on the “Subclass information” property of the property sheet of each item.
In the “Subclass Information” Window choose the property class radio button. Then choose the correct property class for the current item.
Note: You cannot apply property classes to multiple items at once.
Changes to be made in the Triggers and Program Units
Modify specific trigger properties and program units to ensure the form will appear properly in Oracle Apps.
- In the Property Palette of your module modify the ‘First Navigation Data Block’ property to the name of your first data block.
- In the APP_CUSTOM.CLOSE_WINDOW program unit modify the following line:
if (wnd = ‘<first window>’) then
app_window.close_first_window;
by changing <first window> to the name of your first window
Note: Also make sure the ‘Window’ property for your canvases are set to the proper window
Transferring the “.fmb” file from local system to Vision Instance
Now we have to transfer the form from local system to the Vision Instance.
For this you have to go to the command prompt. Go to the directory where the fmb file is there.
- Now give ftp pratik (this is our local instance)
- Give the proper user name and password.
- Now type bin (because we have to transfer the “.fmb” file in binary format)
- Now give mput.<FILENAME.fmb>
Generating the “.fmx” file on the Vision Instance
- Logon To Pratik using Telnet. (i.e telnet pratik)
- Give proper username and password
- Change Directory (cd /d01/oracle/visappl )
- Set the Environment variable by issuing this command: . ./VIS.env
- Now change Directory ( cd /d01/oracle/visora/8.0.6 ).
- Again set the Environment variable by issuing this command: . ./VIS.env
- Switch to your folder where “.fmb” file is present by issuing this command: cd
- Set the character mode for the “.fmb” file by issuing this command
chmod 755 FORMNAME.fmb
- In order to Generate the “.Fmx ” file for the “.Fmb” file, issue the following command
f60gen module=FORMNAME.fmb userid=apps/apps output_file=FORMNAME.fmx module_type=form batch=yes compile_all=special
Note: Type this command in a single line.
- Set the character mode for the fmx file.
chmod 755 FORMNAME.fmx
- Now copy this “.fmb” and “.fmx” files to the US directory. For this we have to give the command as
cp FORMNAME.* /d01/oracle/visappl/cust/1.0/forms/US
We have successfully generated the “.fmx” file for the “.fmb” file, and also we have copied both these files in the US directory. Now we have to assign the Menu for our FORM, which we have created.
Registering the Form in Oracle Applications
In order to Register a form in Oracle Applications, first we need
Application Developer Responsibility
If this responsibility is not there, then assign this responsibility to your username.
Choose the APPLICATION DEVELOPER Responsibility
First we have to define the form
Application Form

The Values entered in the “Form” and “User Form Name” Fields in above window must be identical with the module name of the Form Created.
Now we have to define the Function for the Form
Application > Function

Now go to the tab page with the name “Form”
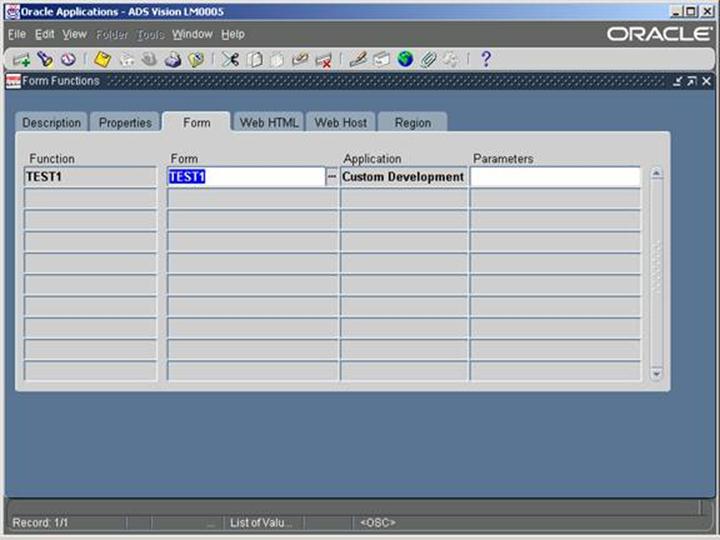
Here we have to select the form name from the Lov. This must be same as the name of the Form, which we have given, in the first form. (i.e Application > Form)
Now we have to assign the menu for the form.
Application > Menu
Here we have to decide, in which responsibility we have to put this form.
Suppose if we want to put our form in Oracle Payables responsibility then
Give this “AX Payables Supervisor ” in the User Menu Name field in Query Mode.
We will get the following screen.
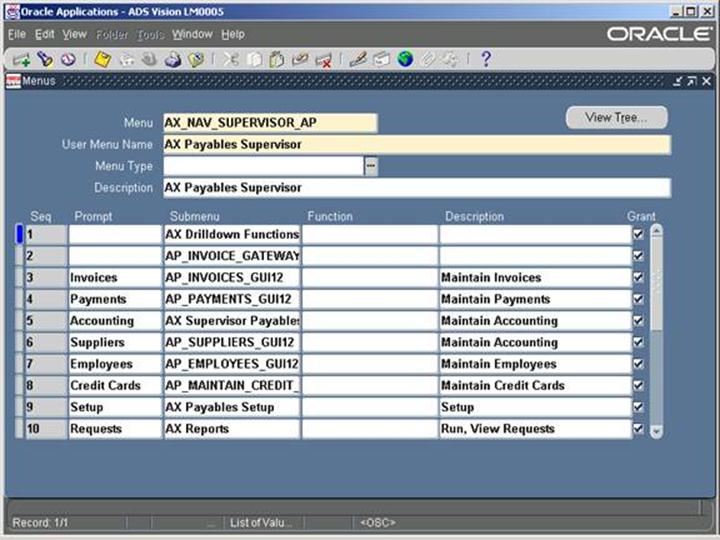
Now we have to decide under which submenu the form should be kept. Suppose if we want to put our form under invoices then copy the Submenu value for the Invoices.
The submenu value for the Invoices here is AP_INVOICES_GUI12
Now copy this value and press f11(i.e go to the enter query mode)
And give this value in User Menu Name field. If we do this we will get the following screen.
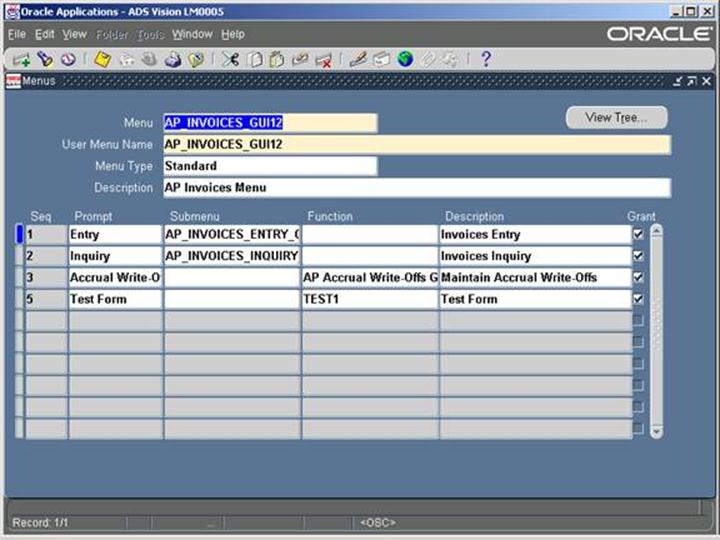
Now insert a new record in the tabular block and save the form.
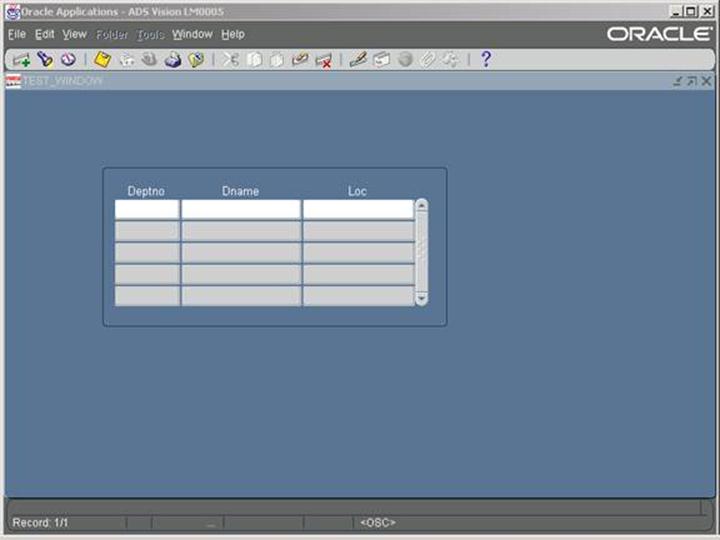
Now we can view our form o the Application.
The form is successfully registered to the Oracle Apps. In order to navigate to the registered form
Switch to the Respective responsibility i.e., Oracle Payables.
Invoices Test Form