Inserting Data
Create EmpEO
Step1: Right click on Resources and select New Entity Object

Step2: Specify the name = EmpEO, Package=trng2.oracle.apps.ak.emp.schema.server (as EO will be in schema.server). Extends Entity will be given if we are customizing so leave blank
Under database objects check “Synonyms” check box so schema objects will be populated to select. It will take some time to generate this list. Select Schema Object as “FWK_TBX_EMPLOYEES”

Step3: It shows all available attributes. If required we can create new transient attributes. Transient attributes are those which we can refer only in application but doesn’t exist in database. We can learn more about transient attribute down the line
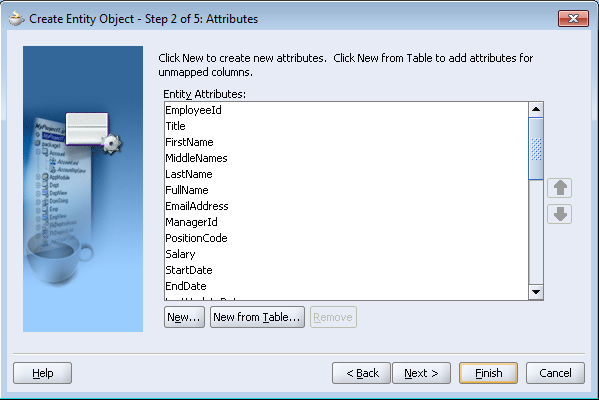
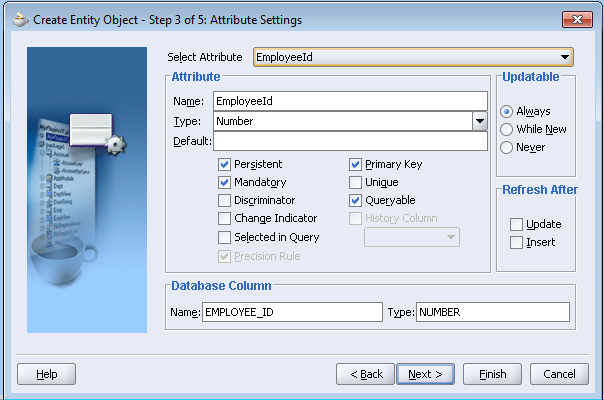
Step4: In next step you can see properties of all attributes. They will by default will get generated as per table definition. Please note that there should be one primary attribute in order to create EO. Also there should who columns
Step5: Under Entity Object Class Generate Java File opt for Accessors, Create method and Remove method

Step6: Don’t select anything here as we will be creating VO separately. You can check this if you want to create VO immediately

Step7: Click Finish

This will create EmpEOImpl.java file with all required fields. This java file will have create method which can be used for defaulting attributes
Here for EMPLOYEE_ID, the value should get from sequence. So we can this attribute with sequence value.
In EmpEOImpl.java Create method looks as below after writing the required code
public void create(AttributeList attributeList) {
super.create(attributeList);
OADBTransaction transaction = getOADBTransaction(); //gets transaction handler from super class
Number seqNo = transaction.getSequenceValue(“FWK_TBX_EMPLOYEES_S”);
setEmployeeId(seqNo);
}
Note: if this is not handled in EO, we can also implement at VO level at the time new record creation.
OAViewObject vo = (OAViewObject)findViewObject(“EmpVO”);
OARow row = (OARow)vo.first();
row.setAttribute(“EmployeeId”, getOADBTransaction().getSequenceValue(“FWK_TBX_EMPLOYEES_S”).toString());
Creating VO
Step1: Right click on Resources and select New View Object

Step2: Specify package = trng2.oracle.apps.ak.emp.server and Name = EmpVO
Extends we can leave blank as we are not extending or customizing existing VO.
VO can be create either with EO or direct SQL Query. Sql Query is used only when we need read only data. As we are using this VO to DML make sure to select “Rows Populated by a SQL Query with” “Updatable Access through Entity Object”

Step3: Select EmpEO from Available list and move to Selected

Step4: Select the attributes you want in VO. You can select all or required attributes only. Here selected all attributes except who columns and dff attribute columns

Step5: In attribute setting verify default information is correct

Step6: In Query page check query generated is correct. You can specify where and order clause if required. To edit the query check “Exper Mode”

Step7: You can see view attribute names and can skip this step

Step8: You can define custom bind variables if required. You can skip this

Step9: You can uncheck Generate Java File under View Object Class unless you want to write code in VO. Check Generate Java File with Accessors for View Row Class

This creates EmpVO.xml and EmpVORowImpl.java

Creating AM
Step1: Right click on Resources and select New Application Module

Step2: Specify package= trng2.oracle.apps.ak.emp.server and Name=EmpAM
Leave Extends blank

Step3: Select EmpVO to associate with AM by moving to data model

Please note that in Data model you can see VO name as EmpVO1 which is instance of actual VO
Step4: Skip this step by clicking Next

Step5: See Generate Java File under Application Module Class is checked

Step6: Click Finish

This creates EmpAMImpl.java

Designing various UI components for EmpCreatePG
Creation of Manager LOV:
Step1: Create common LOV AM which will be used for all LOVs that used in employee application
Right click on resources and New Application Module and specify package = trng2.oracle.apps.ak.emp.lov.server and Name=EmpLovAM

Skip next two steps as we are not selecting any VOs now and in last step UNCHECK “Generate Java Files” as there is no need of coding for LOV AMs. Click on finish in last step

Step2: Create MgrLovVO. Right click on Resources and select New View Object
Specify package = trng2.oracle.apps.ak.emp.lov.server
Name = MgrLovVO

Skip next 3 steps by clicking next and until you get SQL Statement step. Here specify the query as
SELECT full_name AS EMPLOYEE_NAME,
employee_id AS EMPLOYEE_NUMBER,
email_address
FROM fwk_tbx_employees
WHERE end_date IS NULL

Skip all next steps by selecting next until last Java step. Uncheck Generate Java File under MgrLovVOImpl and check Generate Java File under MgrLovVORowImpl and click finish

Step3: Add MgrLovVO to EmpLovAM
Right click on EmpLovAM in Application Navigator and select Edit EmpLovAM

In Data Model select MgrLovVO from Available View Objects and move to right under Data Model

Step4: Create region for LOV
Right click on Resources and select New
Under Web Tier > OA Components select Region

Specify Name = MgrLovRN
Package = trng2.oracle.apps.ak.emp.lov.webui
Style=listOfValues

Select MgrLovRN in structure pane and set AM Definition = trng2.oracle.apps.ak.emp.lov.server.EmpLovAM
Advanced Search Allowed = True
Scope = Public

Right click on MgrLovRN in structure pane and select New > table using Wizard

Select Application Module = trng2.oracle.apps.ak.emp.lov.server.EmpLovAM and MgrLovVO1

Set RegionID=MgrNamesTable

Select all columns and move to right

Skip next steps and finally select finish

For EmployeeName and EmployeeNumber in structure pane set Search allowed to True. This makes LOV to have search items automatically on this field
Creating VO for Implementing Message Choice (drop down / poplist) for positions attribute
Step1: Create PositionsVO by right clicking on Resources and select New View Object
Specify Package = trng2.oracle.apps.ak.emp.poplist.server
Name = PositionsVO

Step2: Skip to query step and specify below query
SELECT meaning, lookup_code
FROM fwk_tbx_lookup_codes_vl
WHERE lookup_type = ‘FWK_TBX_POSITIONS’

Step3: Skip to last to step and uncheck Generate Java File for PositionsVOImpl and check Generate Java File for PositionsVORowImpl

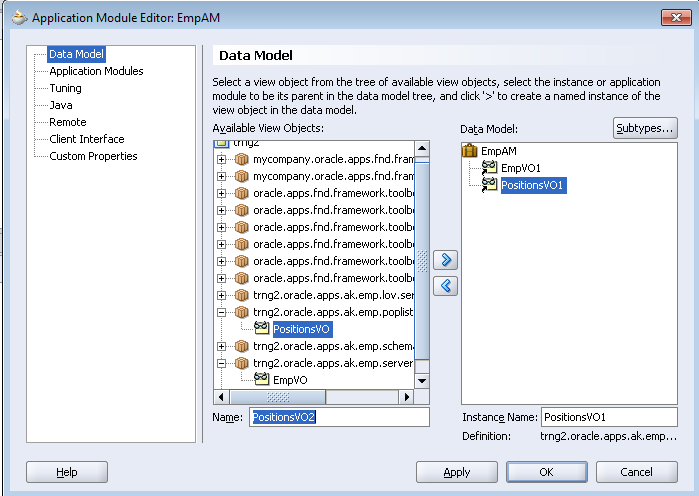
Step4: Assign PositionsVO to EmpAM
Right click on EmpAM in Application navigator and select edit EmpAM
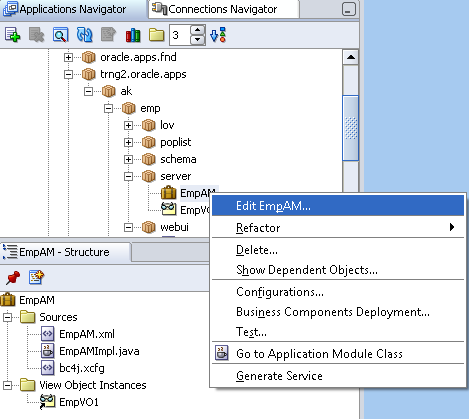
And move PositionsVO from available view objects to Data model
Designing the Page to Input Employee Details
Creating page to input below employee data
- EMPLOYEE_ID (This will be generated automatically and we used sequence in EO to derive this values. So no need of UI item for this attribute)
- TITLE
- FIRST_NAME
- MIDDLE_NAME
- LAST_NAME
- FULL_NAME
- EMAIL_ADDRESS
- MANAGER_ID
- POSITION_CODE
- SALARY
- START_DATE
Step1: Right click on Resources and select New

Step2: Select Page under Web Tier > OA Components

Step3: Specify Name=EmpCreatePG and Package= trng2.oracle.apps.ak.emp.webui

Step4: Set default pageLayout region1 properties as below
ID=PageLayoutRN
AM Definition= trng2.oracle.apps.ak.emp.server.EmpAM
Window Title = Create Employee
Title = Employee Details
Warn About Changes = True (this enable page to warn pending transaction when user tries to navigate from this page. Cancel button is exception)

Step5: To Create Page level buttons Apply and Cancel buttons
First select PageLayoutRN in structure pane, then right click and select New > Region
Set properties as below for this region
ID=PageButtons
Region Style=pageButtonBar
Next to add Cancel button, right click on PageButtons in the structure pane and select New > Item. Set or verify properties of this item as below
ID=Cancel
Item Style=submitButton
Attribute Set= /oracle/apps/fnd/attributesets/Buttons/Cancel
Disable Server Side Validation = True (will not perform server validations)
Disable Client Side Validation=True (will not perform client side validations)
Prompt=Cancel
Warn About Changes=False
Next to add Apply button, Right click on PageButtons in structure pane and select NewItem. Set or verify properties of this item as below
ID=Apply
Item Style= submitButton
Attribute Set= /oracle/apps/fnd/attributesets/Buttons/Apply
Prompt=Apply

Step2: Right click on PageLayoutRN of EmpCreatePG in structure panel and select New Region
Step3: Set region properties as follows
ID=MainRN
Region Style = messageComponentLayout
Step4: Under MainRN create items as below
- MessageStyledText (for Employee ID)
ID=EmpId
Data Type = NUMBER
View Instance = EmpVO1
View Attribute = EmployeeId
Prompt = Employee Number
- Creating radio buttons for Title
In OAF radio buttons on UI behaves as individual unless you group them programmatically. So that it will allows to select one radio button from group. At run time you need to set name and value for each radio button. Radion buttons having same name will be a group.
- messageRadioButton
ID=TitleMr
View Instance = EmpVO1
View Attribute = Title
Prompt = Mr
Checked Value = Mr
- messageRadioButton
ID=TitleMrs
View Instance = EmpVO1
View Attribute = Title
Prompt = Mrs
Checked Value = Mrs
- messageRadioButton
ID=TitleMiss
View Instance = EmpVO1
View Attribute = Title
Prompt = Miss
Checked Value = Miss
- MessageTextInput
ID=FirstName
Maximum Length=20
View Instance = EmpVO1
View Attribute = FirstName
Prompt = First Name
- MessageTextInput
ID=LastName
Maximum Length=40
View Instance = EmpVO1
View Attribute = LastName
Prompt = Last Name
- MessageTextInput
ID=EmailAddr
Maximum Length=240
View Instance = EmpVO1
View Attribute = EmailAddress
Prompt = Email
- MessageLovInput
ID=MgrId
External LOV = /trng2/oracle/apps/ak/emp/lov/webui/MgrLovRN
(note: if any confirmation message displays select yes)
Maximum Length=240
View Instance = EmpVO1
View Attribute = ManagerId
Prompt = Manager
- If we create message lov input, it will have lovMappings under this item in structure panel

By default it will have one mapping item but we can create any number of mapping items. This is used to map item of LOV to current page item
Set lovMap1 properties as below
LOV Region Item = EmployeeNumber
Return Item = MgrId
Criteria Item = MgrId
- MessageChoice
ID=Position
Picklist View Definition= trng2.oracle.apps.ak.emp.poplist.server.PositionsVO
(Note: for picklist view def you need to specify actual VO name. for view instance you have to specify instance name like PositionsVO1)
Picklist Display Attribute = Meaning
PIcklist Value Attribute=LookupCode
View Instance = EmpVO1
View Attribute = PositionCode
Prompt = Position
- MessageTextInput
ID=Salary
Data Type = NUMBER
View Instance = EmpVO1
View Attribute = Salary
Prompt = Salary
- MessageTextInput
ID=StartDate
Data Type = DATE
View Instance = EmpVO1
View Attribute = StartDate
Prompt = Start Date
- MessageTextInput
ID=EndDate
Data Type = DATE
View Instance = EmpVO1
View Attribute = EndDate
Prompt = End Date
Create Controller for EmpCreatePG
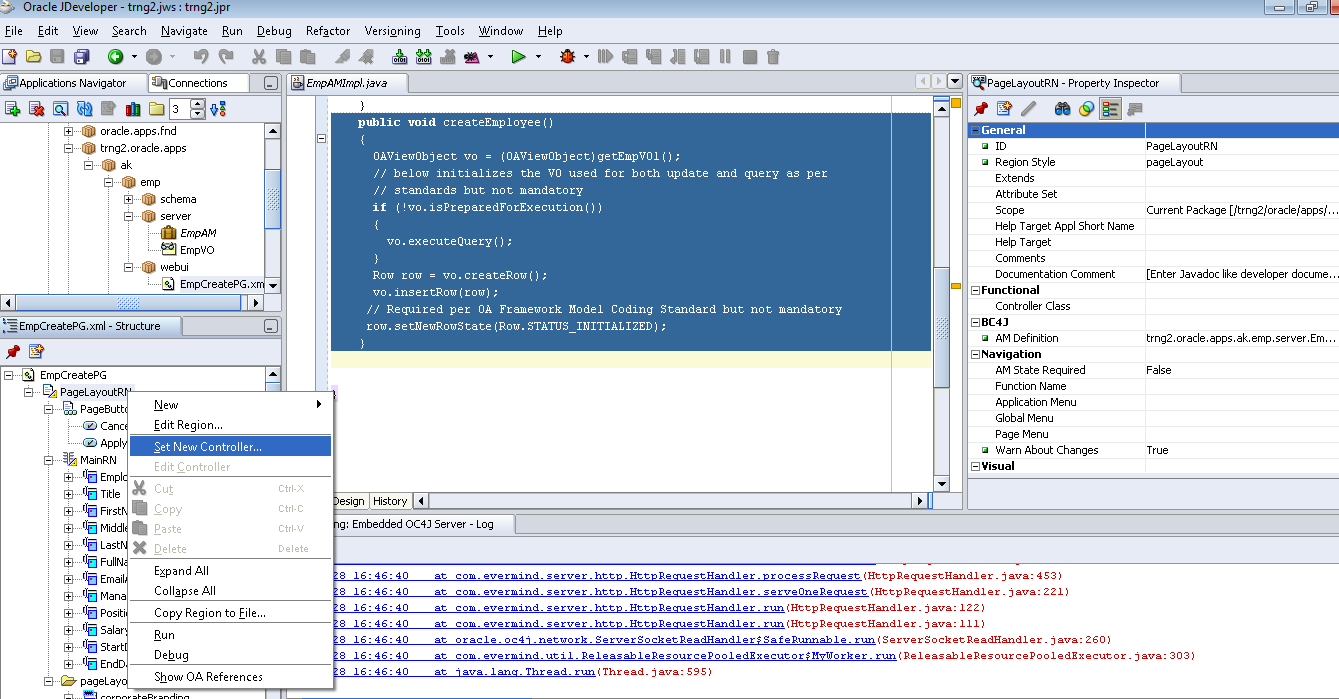
Step1: Right click on PageLayoutRN region in EmpCreatePG and “Set New Controller”
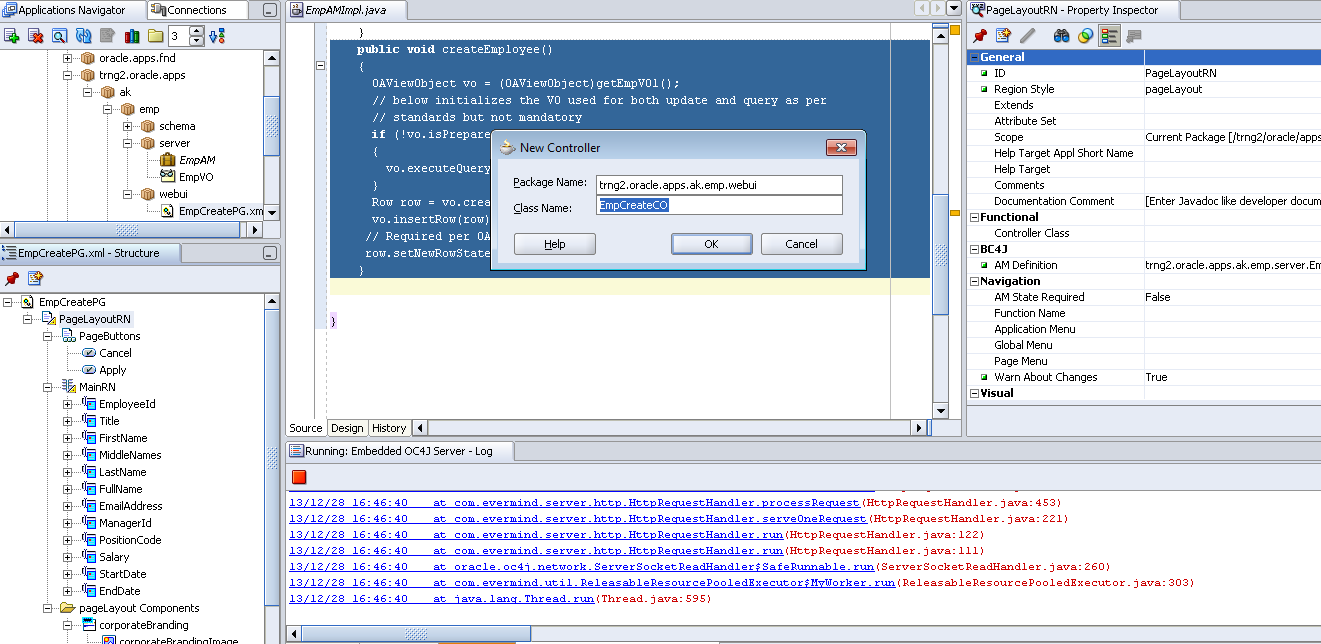
Step2: Specify Package= trng2.oracle.apps.ak.emp.webui and Name= EmpCreateCO
Row Initialization to create a new record
Before providing values to VO need to create a VO row. This VO row will receive values when form submitted.
Step1: Add createEmployee() method in EmpAMImpl.java
public void createEmployee()
{
OAViewObject vo = (OAViewObject)getEmpVO1();
// below initializes the VO used for both update and query as per
// standards but not mandatory
if (!vo.isPreparedForExecution())
{
vo.executeQuery();
}
Row row = vo.createRow();
vo.insertRow(row);
// Required per OA Framework Model Coding Standard but not mandatory
row.setNewRowState(Row.STATUS_INITIALIZED);
}
Step2: Add apply method which is used to commit the pending transaction at AM level
public void apply()
{
getTransaction().commit();
}
Step3: Add rollback method which is used to rollback the pending transaction at AM level
public void rollbackTxn()
{
getTransaction().rollback();
}
Write below code in EmpCreateCO.java in processRequest method to set group for radio buttons used for Title column. It should be under super constructor in processRequest method. Otherwise they will not behave as a group
public void processRequest(OAPageContext pageContext, OAWebBean webBean)
{
super.processRequest(pageContext, webBean);
OAMessageRadioButtonBean rbMr = (OAMessageRadioButtonBean) webBean.findChildRecursive(“TitleMr”);
rbMr.setName(“Title”);
rbMr.setValue(“Mr”);
OAMessageRadioButtonBean rbMiss = (OAMessageRadioButtonBean) webBean.findChildRecursive(“TitleMiss”);
rbMiss.setName(“Title”);
rbMiss.setValue(“Miss”);
OAMessageRadioButtonBean rbMrs = (OAMessageRadioButtonBean) webBean.findChildRecursive(“TitleMrs”);
rbMrs.setName(“Title”);
rbMrs.setValue(“Mrs”);
if (!pageContext.isFormSubmission())
{
//below two statements can also be used to call AM method
// OAApplicationModule am = pageContext.getApplicationModule(webBean);
// am.invokeMethod(“createEmployee”,null);
EmpAMImpl am = (EmpAMImpl)pageContext.getApplicationModule(webBean);
am.createEmployee();
}
Step4: In processFormRequest of EmpCreateCO write below code which will execute on clicking apply or cancel button
public void processFormRequest(OAPageContext pageContext, OAWebBean webBean)
{
super.processFormRequest(pageContext, webBean);
OAApplicationModule am = pageContext.getApplicationModule(webBean);
if (pageContext.getParameter(“Apply”) != null)
{
am.invokeMethod(“apply”);
}
if (pageContext.getParameter(“Cancel”) != null)
{
am.invokeMethod(“rollbackTxn”);
}
}
To default FullName
In EmpEOImpl.java add highlighted code in below two methods
public void setFirstName(String value) {
if ((value != null) || (!(“”.equals(value.trim()))))
{
String lastName = getLastName();
if (lastName == null)
{
lastName = “”;
}
setFullName(lastName.concat(“, “).concat(value));
}
setAttributeInternal(FIRSTNAME, value);
}
public void setLastName(String value) {
if ((value != null) || (!(“”.equals(value.trim()))))
{
String firstName = getFirstName();
if (firstName == null)
{
firstName = “”;
}
setFullName(value.concat(“, “).concat(firstName));
}
setAttributeInternal(LASTNAME, value);
}
Validating start date not to be less than sysdate
In EmpEOImpl.java add highlighted code in below method
public void setStartDate(Date value) {
validateStartDate(value);
setAttributeInternal(STARTDATE, value);
}
Write validateStartDate method in EmpEOImpl.java as below
OADBTransaction transaction = getOADBTransaction();
long sysdate = transaction.getCurrentDBDate().dateValue().getTime();
long startDate = value.dateValue().getTime();
if (startDate < sysdate)
{
throw new OAAttrValException(OAException.TYP_ENTITY_OBJECT,
getEntityDef().getFullName(), // EO name
getPrimaryKey(), // EO PK
“StartDate”, // Attribute Name
value, // Attribute value
“AK”, // Message product short name
“FWK_TBX_T_START_DATE_PAST”); // Message name
}